Manual in PDF format
1. Subject and purpose of the document
- The purpose of this document is to describe the procedure for commissioning and using the Scan2NG application in the NET Genium system environment. Scan2NG allows its users to scan documents directly to NET Genium without the need for additional applications or saving scanned files to disk.
2. Simplified procedure
- The Scan2NG application can be used provided that:
- NET Genium is running in a web browser,
- the scanner you are using has a “Windows Image Acquisition” (WIA) driver installed,
- the user has access to the “Document” form in NET Genium.
- 1. Install the scanner on your computer
- 2. Check for the presence of the WIA driver
- 3. Download Scan2NG from https://www.netgenium.com/download/Scan2NGv2.msi
- 4. Install Scan2NG on your computer
- 5. Scanning documents to NET Genium
3. Install the scanner on your computer
- The scanner can be connected to your computer with a cable, or it can be on the same network as your computer. In addition to the physical connection to the computer, you must also install drivers on the computer to ensure that the scanner functions properly. The drivers are usually shipped on an optical medium with the scanner or are freely available for download from the manufacturer's official website. When installing the driver itself, it is necessary to follow the wizard, which will ensure the correct installation of the respective driver.
- The OKI MC562 multifunction scanner was used for the purposes of this manual. The device manufacturer offers several types of drivers when installing from optical media. The driver for the scanner is labeled “OKI-MC562-468907”.
4. Checking for the presence of the “WIA” driver
- “WIA” or “Windows Image Acquisition” is a driver that generally allows you to scan documents without the need for a special program. After installing the scanner driver, you can test whether the driver supports WIA within the Windows operating system. The “Fax and Scan” application can be used for this purpose.
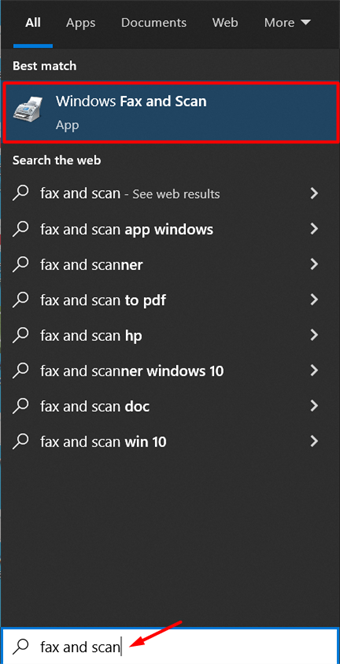
- You can start the “Fax and Scan” application, for example, via a Windows search, where you type “Fax and Scanner” into the search engine. Windows should offer the application to open.

- After opening the “Fax and Scan” application, set the “Scan” mode by clicking the “Scan” button.

- Press the “New Scan” button to ensure that it connects to the appropriate scanner and displays the scan settings options.

- If the “Rescan” window below does not appear, it means that the “WIA” driver is not installed on your computer or that the scanner does not support this driver. After pressing the “Scan” button, the scan itself should be performed, with the scanner set to scan.

5. Download Scan2NG
- Download Scan2NG from https://www.netgenium.com/download/Scan2NGv2.msi.
6. Install Scan2NG
- The user will be guided through the installation of the Scan2NG application by a clear wizard.
- Click “Next” on the initial page of Scan2NG installation.

- On the next page, select or confirm the directory in which the Scan2NG application will be installed and set which users using the respective computer will be able to use this application (“Everyone” or “Just me” option).

- Click “Next” to complete the installation.

- Press the “Close” button to close the application installation process.

7. Document scanning
7.1. Start Scan2NG
- Search for “Scan2NG” in the start menu and start the application.

7.2. Scanner settings
- After starting the application, it is necessary to set the application “Scan2NG”.
- In the newly opened dialog box, set the scanner parameters, such as scanner selection, “Feeder”, “Resolution”, “Quality”, “Brightness” and “Contrast”. The “Feeder” item is a relatively important setting. This is because what type of scanner will be used for scanning. If the scanner can automatically scan multi-page documents, select “Feeder”, which is set as the default. Select “FlatBed” if the scanner cannot change the scanned pages automatically and needs assistance. Incorrect selection of the “Feeder” option may result in an error when scanning. Then you need to go back to the Scan2NG settings and set up the correct feeder.

- Then click the “OK” button and the “Scan2NG” application will be set. At the same time, the configuration files “Device.txt”, “Handling.txt”, “Resolution.txt”, “Quality.txt”, “Brightness.txt” and “Contrast.txt” will be created in the same directory where Scan2NG is installed. If these files are deleted, you need to set up the scanner again.
7.3. Scanning in the “Document” form
- The “Scan2NG” application is used in the NET Genium in the “Document” form. For this reason, you need to open this form.

- The “Document” form includes a “Scan” button, which scans the document in paper form on the selected and set scanner in cooperation with the running “Scan2NG” application. The newly created document in “pdf” format is then saved in the open “Document” form in the first free attachment (for example “Annex 1”). Up to 5 attachments can be inserted into the “Document” form.

8. Problem solving
- If a chapter were omitted in the procedure 7.2, so when you press the “Scan” button, NET Genium will display a message stating that the scanner must be set up first.

- If the scanner is set to the wrong “Feeder”, NET Genium will display the following message when trying to scan a document. In this case, it is necessary to return to the scanner settings 7.2 and reset the device.

- If the number of free attachments is already exhausted at the time of scanning, NET Genium will warn the user that it is not possible to save the scanned document.

