Manual in PDF format
1. Preparation
- The procedure is described in detail for Windows Server 2016 in the English version. All actions must be performed under administrator rights.
- Install the services and tools that are required for the SMTP server (IIS 6 Management Console and SMTP server).
1.1. Windows Server 2016
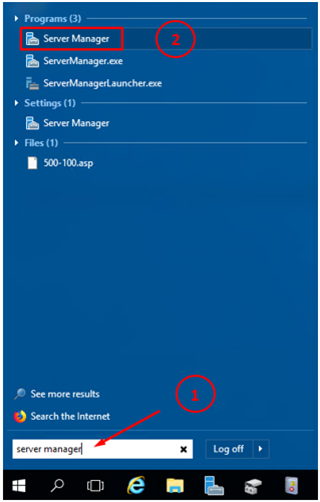
- Start “Server Manager” via the “Start” menu.

- You will see a window with all kinds of server administration. If you do not have IIS installed, you must first install this service (see, for example, the “NET Genium Installation” guide). The next step assumes that IIS is already installed on the server. “Roles” and “Features” will be important for the installation of the IIS 6 Management Console and the SMTP server. IIS acts as a role on the server.
- Press “Add roles and features” and then select an option “Server Roles”.


- In the next step, the system lists all the “Server Roles” that are available on the server.
- Select the following sections here and press the button “Install” :
- Management Tools
- IIS 6 Management Compatibility
- IIS 6 Management Console
- IIS 6 Management Compatibility

- The next step is to install the “SMTP server” application.
- In the “Server Manager” application, select “Add features” and select “SMTP server” in the list and press the button “Install”.

2. SMTP server settings via IIS 6.0 Manager
Start “IIS 6.0 Manager” via the “Start” menu.

- When the program starts, the following screen will appear.

2.1. SMTP Virtual Server
- The next procedure for setting up an SMTP Server is in “Internet Information Services (IIS) 6.0 Manager”.
- Right-click on “SMTP Virtual Server” and select “Properties”.

2.1.1. Connection
- In the “Access” tab, click on the button “Connection…”.

- In the next window, set the list of all IP addresses from which the connection to the SMTP Server will be allowed. If you will only be able to connect from our server, check “Only the list below” and add the IP address to the list “127.0.0.1”.

2.1.2. Relay
- In the window that will open, select the “Access” tab and press the button “Relay…”.

- In the next window, set a list of all IP addresses from which forwarding to the SMTP Server will be enabled. If forwarding from only our server will be enabled, check “Only the list below” and add the IP address to the list “127.0.0.1”.

2.1.3. Messages
- Next, go to the “Messages” tab, where you can disable the message size limit, the “session” limit and the number of messages within one connection.

2.1.4. Delivery
Then go to the “Delivery” tab and click on the “Advanced…” button.

- Set FQDN (Fully-qualified domain name)
- Important note: You need to contact your ISP to create a reverse lookup (PTR) that must match your FQDN.

3. Services settings
- Start “Services” via the “Start” menu.

3.1. Simple Mail Transfer Protocol
- Find the “Simple Mail Transfer Protocol” service, right-click on it and select “Properties”.

- On the “General” tab, set the Startup type to “Automatic”.

4. Firewall settings
- Via the “Start” menu, start the Firewall settings, such as administrator.

- In order for anyone not to be able to log in to the SMTP server and send messages from it, it is necessary to block the SMTP-In Protocol. SMTP-In Protocol can be blocked in two different ways.
4.1. Complete blocking of all IP addresses

- In “Inbound rules”, right-click on “Simple Mail Transfer Protocol (SMTP-In)” and select “Disable Rule”.
4.2. Block all IP addresses except selected ones
- In “Inbound rules”, right-click on “Simple Mail Transfer Protocol (SMTP-In)” and select “Properties”.

4.2.1. General
- In the newly opened “Simple Mail Transfer Protocol (SMTP-In) Properties” window, go to the “General” tab, select the “Allow the connection” option and press the “Apply”.

4.2.2. Scope
- To allow only certain IP addresses to log in to the SMTP server, enter the list of IP addresses on the “Scope” tab in the “Remote IP address” field.

5. Start the SMTP server in IIS 6.0 Manager
- After successfully setting up the SMTP server, start the SMTP server via “Internet Information Services (IIS) 6.0 Manager”. In the program, right-click the SMTP Server and select an option “Start”.

