1. List of supported browsers
1.1. Web browsers designed for full-fledged work in NET Genium
- Google Chrome
.svg)
- Microsoft Edge
.svg)
- Safari

- Mozilla Firefox

- Opera

- Internet Explorer

2. Google Chrome settings
2.1. Setting up automatic login via Active Directory
- Google Chrome uses Internet Explorer system settings. For automatic login via Active Directory, it is therefore necessary to set up Internet Explorer (see chapter 4.1).
- If you do not need this feature, you can leave the Internet Explorer settings by default.
2.2. Enable automatic pop-ups
- NET Genium automatically uses pop-ups, for example, when printing reports, setting a composite filter condition in a lookup table, or assigning a value to all filtered records.
- When you choose to print to a print report, the web browser automatically brings up a pop-up window. Click the pop-up icon in the upper-right corner of your web browser, select “Always allow pop-ups” and click on the “Done” button.

- When setting a composite filter condition in the lookup table or assigning a value to all filtered records, the web browser can also automatically bring up a pop-up window.


2.3. Disable the Chrome Download Bubble
- If you don't see a bar with a link to the downloaded file when downloading a file, you need to disable the Chrome Download Bubble. Although the file is successfully downloaded to the Downloads directory, it is not clear at first glance whether the flow actually occurred.
- Open Chrome.
- Type chrome://flags in the address bar and press Enter to enter the flags interface.
- Type download bubble into the top search box and the search results will automatically appear.
- Select Disabled for both Enable download bubble and Enable download bubble V2.
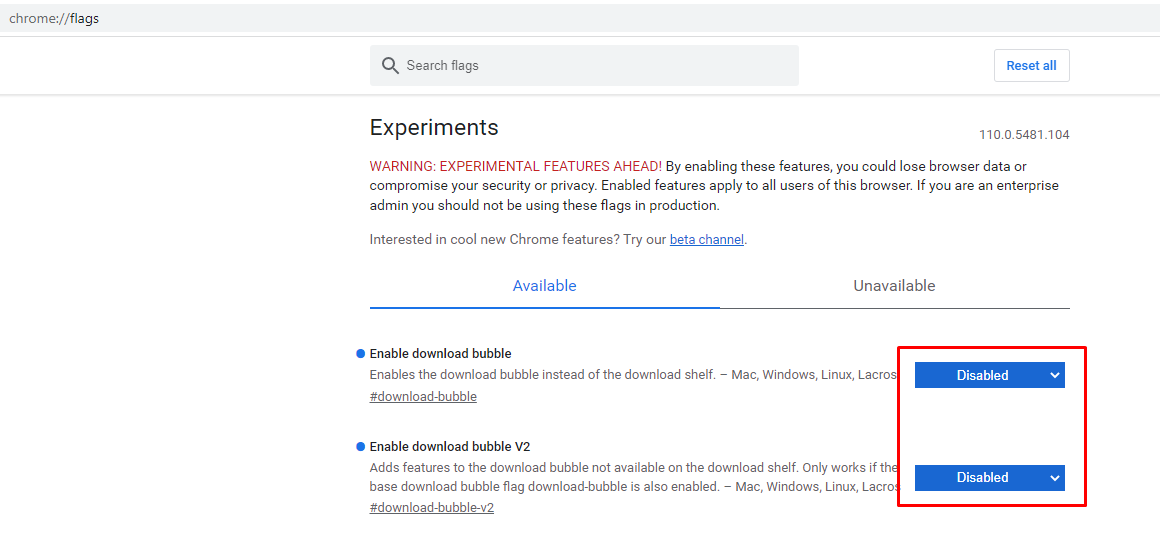
- Click the Relaunch button to restart your Chrome browser.
3. Mozilla Firefox browser settings
3.1. Setting up automatic login via Active Directory
- For automatic logon through Active Directory, you must set up integrated Windows authentication in your Web browser.
- If you do not need this feature, you can leave your web browser settings by default.
- Type “about:config” in the address bar of your web browser and confirm with enter.

- Confirm the entry of the settings with the “Accept the Risk and Continue” Button.
- Type “negotiate” into the search engine and double-click on the option “network.negotiate-auth.delegation-uris”.

- In the newly opened dialog box, enter the address of your NET Genium and confirm with the “Tick” button.
- Then double-click to select “network.negotiate-auth.trusted-uris”.
- In the newly opened dialog box, enter the address of your NET Genium and confirm with the “Tick” button.

- Close the web browser.
- Made changes will take effect after restarting the web browser.
4. Internet Explorer 11 settings
4.1. Set up a local intranet zone or trusted sites
- After starting NET Genium in the web browser window, check the settings of the zone in which your NET Genium is located.
- For automatic login via Active Directory, it is necessary to place the address of your NET Genium in the local intranet zone (see chapter 4.1.1).
- For the correct functioning of ActiveX objects needed for POS printers, for example, it is necessary to place the address of your NET Genium in the trusted websites zone (see chapter 4.1.2).
- If you do not need any of the above functions, you can leave the default zone settings – the Internet zone.
4.1.1. Intranet zone settings
- To use automatic Active Directory logon within an intranet (internal computer network), it is important to place the NET Genium address in the local intranet zone.
4.1.1.1. Add a NET Genium address to the Local intranet zone
- Go to “Tools > Internet Options > Security”, select “Local intranet” and click on the “Sites” button.

- In the dialog box that just opens, click on the “Advanced” button and add the address of your NET Genium to the intranet zone with the “Add” button.


4.1.1.2. Compatibility View Settings
- In the local intranet zone, Internet Explorer automatically displays all Web pages in a compatible view. This means that the page of your NET Genium will be displayed from a design point of view in an older version. If you want to view your NET Genium in a new (current) version, do the next step.
- Go to “Tools > Compatibility View Settings” and uncheck “Display intranet sites in Compatibility View” checkbox.
- If you want to display some other sites in the intranet zone in a compatible view, add them to the list of sites designated for compatible view via the “Add” button in “Compatibility View Settings”.

4.1.1.3. Enable Integrated Windows Authentication
- Go to “Tools > Internet Options > Advanced” and check the “Enable Integrated Windows Authentication” checkbox.

4.1.2. Trusted sites zone settings
- For the correct functioning of ActiveX objects, which are used for POS printers, for example, it is important to place the NET Genium address in the trusted sites zone (this setting is only needed if you want to use these ActiveX objects).
4.1.2.1. Add a NET Genium address to the trusted sites zone
- Go to “Tools > Internet Options > Security”, select “Trusted sites” and click on the “Sites” button.

- In the dialog that just opens, add the address of your NET Genium to the trusted sites zone via the “Add” button.

4.1.2.2. ActiveX control settings
- Go to “Tools > Internet Options > Security > Trusted sites > Custom level...”

- In the “ActiveX controls and plug-ins” section > “Initialise and script ActiveX controls not marked as safe for scripting” select “Prompt” or “Enable”.

4.2. Enable pop-ups
- NET Genium uses pop-up windows when printing reports.
- When you choose to print to a print report, the web browser opens a pop-up window. In this window, click on “Options for this site” and select “Always allow”.

4.3. Temporary Internet file and history settings
- For dynamic web applications such as NET Genium, it is necessary to set up automatic detection of new versions of web pages.
- Go to “Tools > Internet Options > General > Settings > Temporary Internet Files”. Here we recommend setting “Automatically” or “Every time I visit the webpage”.


