1. NET Genium settings
- NET Genium settings are available to all users with administrator privileges.
2. List of tabs in the settings dialog NET Genium
- General – Setting general properties of NET Genium
- E-mails – Email settings
- Printing templates – Setting up print templates
- Authorization – Permission settings
- Passwords – Password settings
- Colors – Color settings
- Other – Setting other properties
2.1. “General” tab
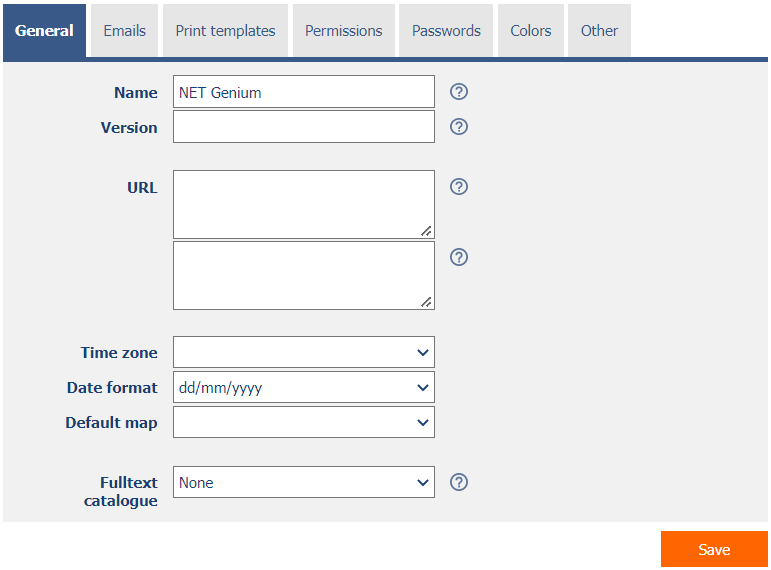
2.1.1. Name
- The name NET Genium displayed in the web browser tab.
- The NET Genium name is stored in the server variable “#portal#”.
2.1.2. Version
- The NET Genium version displayed in the header of the web browser and in the subject of all outgoing e-mail messages.
2.1.3. URL
- NET Genium intranet address – the Enter-separated list of these addresses will be u sed when initializing NET Genium in multiple instances.
- Internet address of NET Genium – the Enter-separated list of these addresses will be used in e-mail messages sent by the script and will ensure that the user can be redirected to NET Genium for specific records.
2.1.4. Time zone
- The NET Genium time zone is automatically set to the time zone of the server on which NET Genium is hosted.
- By selecting a specific time zone from the drop-down list, this setting can be changed to the desired value.
2.1.5. Date format
- The date format affects the display of date data across the entire application.
- The drop-down list contains the following options:
- dd/mm/yyyy – day month Year
- mm/dd/yyyy – month, day, year
2.1.6. Default map
- The default map defines the default geographical center of all map data that does not contain any points on the map in the currently displayed data visualization. In other cases, the geographic center is calculated automatically from all points displayed on the map.
- The default map controls the search for addresses stored in “TextBox” controls called “Find on map”, “Find on map” or “Find on map”.
- The drop-down list contains the following options:
- Czech Republic – address search offers map portals “maps.google.cz” and “www.mapy.cz”.
- Slovakia – address search is offered by the map portal “maps.google.sk”.
2.1.7. Full-text catalog
- Catalog for the full-text file attachment search function.
- The drop-down list contains the following options:
- None – File attachments are never searched while searching for values in lookup tables.
- Windows Search – while searching for values in the look-up tables, file attachments are searched using the “Windows Search” full-text catalog. A detailed description of the configuration of the “Windows Search” full-text catalog is given in the separate “NET Genium Installation” manual.
- Indexing Service – while searching for values in look-up tables, file attachments are searched using the “Indexing Service” in the catalog, the name of which is entered in the text field below the drop-down list of the full-text catalog. The “Indexing Service” was last available in the “Windows Server 2008” operating system, so we recommend replacing its use with the full-text catalog “Windows Search”. A detailed description of the configuration of the “Windows Search” full-text catalog is given in the separate “NET Genium Installation” manual.
2.2. “Emails” tab

2.2.1. Default sender of all messages
- An email address that will be set as the default sender of all messages. Emails that have senders from another domain will be sent using the default sender of all messages.
2.2.2. System warnings
2.2.2.1. Service e-mail address
- Administrator's email address for sending system messages. If the address is empty, no system messages will be sent.
- E-mail messages with an empty sender (NG NO-RCPT will be inserted in the subject of the message:)
- Reports of exceeding the maximum number of logged in users
- Error messages in applications or when synchronizing records
2.2.3. Outgoing mail server
2.2.3.1. SMTP Server 1
- The name or Internet address of the SMTP mail server used to send e-mail messages.
- SMTP Server 1 is used to send e-mail messages through the following commands:
- View page – New e-mail message
- Button – Open the form for entering a new e-mail message
- Script – Send email
- Script – SENDMAILMESSAGE()
- Script – SENDMAILINVITATION()
- Script – SCHEDULEMAILMESSAGE()
2.3.2.2. SMTP Server 2
- The name or Internet address of the SMTP mail server used to send e-mail messages.
- SMTP Server 2 is used to send e-mail messages through the following commands:
- Backup SMTP Server – all e-mail messages that fail to be sent the first time using SMTP Server 1 are forwarded for sending using SMTP Server 2. If SMTP Server 2 is not defined, or fails when sending a message using SMTP Server 2, the e-mail message is saved in the “SMTP” directory as an “eml” file, and “ResendEmlFiles.exe” tries to resend it, Which is typically run every 30 minutes using a scheduled task.
- Script – SENDMAILMESSAGE2()
- If neither SMTP Server 1 nor SMTP Server 2 is defined, all e-mail messages are stored in the “SMTP” directory in the form of “eml” files. The “ResendEmlFiles.exe” program, which typically runs every 30 minutes with a scheduled task, attempts to resubmit them. Messages successfully sent by “ResendEmlFiles.exe” are deleted from the “SMTP” directory, unsuccessful messages sent by “ResendEmlFiles.exe” will be sent a total of 48 times (which corresponds to attempts to send a message during a full day at 30 minute intervals), and then ignores these files in the “SMTP” directory. The list of unsuccessfully sent or already ignored messages is stored in the configuration file “SMTP/ResendEmlFiles.errors”.
2.3. “Print templates” tab

- List of print templates stored in the “Templates” directory with the option to add or remove templates from this directory.
- Print templates from this list are offered in “File” and “Button” controls.
- Unused print templates are shown in italics.
- A detailed description of print templates is given in the separate Print templates manual.
2.3.1. Statistics
- Statistics display aggregated information about the use of printing templates across the entire application.
- The “Statistics” link displays a detailed report of all controls that use this template, including the ability to open the settings for this control.
2.3.2. Add a template
- Button for inserting a new print template in the “Templates” directory.
2.4. “Permissions” tab

2.4.1. User account administrator
- List of user groups or users who:
- they can set a new password for other users (except for users who have administrator privileges).
- they can set up new user groups for other users (except for users who have administrator privileges).
- they can set up new user groups for each permission group.
- they can send a chat message to all users of the application (as well as users with administrator privileges).
- sees all sessions in the list of online users (as well as users with administrator privileges). Other users see only one record for each user online, in terms of time the one with the latest user login date.
2.4.2. IP addresses allowed
- List of allowed IP addresses from which it is possible to log in to the application if the user is a member of the selected user group.
- The list of allowed IP addresses is used to set restrictions for users who are in the “Administrators” group and therefore have administrator privileges, including the administrator mode option. Administrator mode is then enabled only if the user accesses the application from specific IP addresses. If the user accesses from another IP address, the administrator mode option is removed, but the option to log in to the application remains enabled.
- The list of allowed IP addresses is used to set restrictions for users who are not in the “Administrators” group. If the user accesses from another IP address, the option to log in to the application is removed.
- The allowed IP address can take the following values:
- 1.2.3.4 – access is allowed only for this specific IP address
- 1.2.3 – access is allowed for all IP addresses where the first three parts agree, the value of the fourth part can be arbitrary
- 1.2 – access is allowed for all IP addresses where the first two parts agree, the value of the third and fourth part can be arbitrary
- 1 – access is allowed for all IP addresses where the first part agrees, the following three parts can be arbitrary
2.4.3. Public external functions
- List of public external functions that are accessible even for unregistered users.
- The definition of a public external function must contain only the identifier of the external function, ie the value of the “string id” parameter. A detailed description of external functions is given in the separate manual “External functions”, and also for the function “string ngef” in the separate manual “Server functions”.
2.4.4. Add IP address
- Button for entering a new record of the allowed IP address.
2.4.5. Add external function
- Button for inserting a new record of a public external function.
2.5. “Passwords” tab

2.5.1. Password strength required
- The password strength setting determines how complex passwords must be when changing old passwords to new ones.
- None – The password may be blank.
- Weak – The password must be at least 5 characters long. The password expires every 12 months, and the new password may be the same as the previous one.
- Fair – The password must be at least 8 characters long, and must contain at least 3 characters from the set {lowercase, uppercase, numbers, special characters}. The password expires every 12 months, and the new password cannot be the same as the previous one.
- Strong – The password must be at least 12 characters long (administrator password at least 17 characters), and must contain all characters from the set {lowercase, uppercase, numbers, special characters}. The password expires every 12 months, and the new password cannot be the same as any of the previous passwords.
- Special characters: – _ , . : ; ! @ # $ % ^ & * = + () {} [] < > / ? ' ` | §
2.5.2. Printing templates
- Password required when editing print templates by a user who does not have administrator privileges. If the password is blank, print templates cannot be edited.
- The website for editing print templ ates is located at “url-netgenium/templates”.
2.5.3. Restart
- Password re quired when restarting NET Genium by a user who does not have administrator privileges. If the password is blank, NET Genium will not be restartable.
- The NET Genium restart web site is located at “url-netgenium/restart”.
2.5.4. Synchronization
- If the password is blank, it will not be possible to synchronize data from the re mote server with your NET Genium.
2.6. “Colors” tab

- List of colors offered by the color designer when editing a value in “TextBox” controls with the “Show color designer in edit form” option checked.
- If the color list is empty, the color designer offers a default color palette.
2.6.1. Add color
- Button for inserting a new color record.
2.7. “Other” tab

2.7.1. E-Learning
- The e-learning style setting determines what appearance will be used to visualize e-learning courses.
- Style A – displays e-learning courses in pleasant blue and orange colors and contains pictorial navigation buttons.
- Style B – is rather conservative and respects the color settings of NET Genium.
2.7.2. Logging
- Logging is used to measure the processing time of database queries, scripts, view pages, edit form s and external functions.
- Off – Server-side processing times are not measured.
- To database – Processing times for database queries, scripts, view pages, edit form s and external functions are stored in the database. From this data it is possible to display aggregated statistics using the “Logging” button directly in the settings of the given control element, resp. its database query, as well as in the settings of the script, view page or edit form. Another option is to display these statistics on the reports page, where statistics of measurements of external functions are also available. A detailed description of the reports is given in a separate manual “Reports”.
- To disk – Processing times for database queries, scripts, view pages, edit forms and external functions are stored on disk in the “Logs” directory.
- To database and disk – Server-side processing times are stored in the database and on disk at the same time.
- Logging to console – Processing times for preview pages and client-side edit forms are displayed in the console at the bottom of the web browser.
- Data Transferring Time – communication time between client and server
- Page Processing Time – server-side page processing time
- Page Rendering Time – time of page rendering in the web browser
- Total Waiting Time – total waiting time for the page to be viewed
- Measure memory consumption – Monitoring the memory consumption of each database query that retrieves data.
- Memory consumption is calculated as the difference of the allocated memory of the “w3wp.exe” process before and after the data is successfully retrieved from the database.
- The “w3wp.exe” process serves the requests of all users of the web application, so the calculated value may be inaccurate and may also include the memory consumption of other requests.
- The calculated value can also be negative if memory was freed by the Garbage Collector during data loading.
- The measured value of memory consumption is available in reports when database logging is enabled, and on disk in the log file “Logs\yyyy-DD-mm.log” for those database queries whose memory consumption exceeds 1GB (the word “LastMemoryConsumption”).
- Delete old logs in the database – Deleting all measured data in the database.
- Delete old logs on the disk – Delete all measured data on the disk in the “Logs” directory.
2.7.3. Options
- Enable automatic error reporting to NetGenium
- Checking this box determines whether each error should be automatically sent to NetGenium Technical Support.
- For each error in NET Genium, an error message will be displayed on a separate page, where you can manually send the error to NetGenium Technical Support.
- Log usage of view pages
- Checking this box determines whether the use of individual preview pages in the database should be logged in the “Settings” application:
- Logging into the “Settings/Statistics” table – Visited view page, User, Date
- Logging into the table “Settings/Statistics 2” – Visited view page, Number of visits
- Logging into the table “Settings/Statistics 3” – Visited view page, User, Number of visits
- View page logging is used to detect underused or unused view page s by users.
- The opening of the same page by the same user is logged in the database only once an hour.
- Enable sending lost passwords on the login page
- Checking this box determines whether the “Forgot Password” button should be displayed on the login page next to the “Login” button, which is used to send a forgotten password to the user's email address.
- A forgotten password can only be sent once a day for each user.