Manual in PDF format
1. Introduction
- This guide describes how to work with the development environment. The individual chapters contain:
- How to create a new development environment
- How to transfer the development environment to the operational
- How and why to resolve conflicts in the original and new database structure
- How to transfer operational data to the development environment
2. Creating a new development environment
- This process can be characterized by the following steps:
- Creating (installing) a new NET Genium
- NET Genium development settings
- Operational database backup
- Recovery of the operational database in the development environment
2.1. Creating a development NET Genium
- It consists in installing the new NET Genium. The installation is characterized by the Installing NG
2.2. Setting a development NET Genium
- License – A copy of the operating license key can be used to upload the license to the NET Development Developer. Therefore, copy the file “license.txt” from the “Config” directory of the operating NET Genium to the “Config” directory of the development.
- External functions – if NET Genium uses programmed external functions, they can be transferred by copying the file “ngef.dll” or “ngef.pdb” to the development environment (directory “bin”). It is also necessary to copy other program libraries that can be used in the “ngef.dll” library, typically “ERP.dll”.
- Printing templates – to transfer the printing templates, copy the contents of the “Templates” directory of the operating NET Genium to the “Templates” directory of the development.
- File attachments – to transfer file attachments, copy the contents of the “Files” directory of the operating NET Genium to the “Files” directory of the development.
2.3. Operational database backup
- Use the “SqlBackup.exe” program to back up the operational database. It is located in the “Backup” directory. It supports backup of both MSSQL and Firebird databases.
- Use:
SqlBackup.exe [source] [target]
- Parameter source specifies the database name (MSSQL) or the full path to the disk database (Firebird).
- Parameter target specifies the name of the file in which the backup will be saved.
When running without parameters, the program offers several options depending on the activities performed.

- The database backup is performed by the option B. When started, the program searches all available databases according to the default instances of the MSSQL server ((local) and (local)\SQLEXPRESS) or based on registry entries and offers the user which database to back up. In the case of the Firebird database, the locations “E:\Firebird”, “D:\Firebird” and “C:\Firebird” are automatically searched.
- The parameter can also be used when running the “SqlBackup.exe” program'' –S , which can be used to specify a specific instance of the MSSQL server in case one of its instances is not found automatically (ie does not have an entry in the system registry under the key “HKEY_LOCAL_MACHINE\SOFTWARE\Microsoft SQL Server\Instance Names\SQL” or has a non-default instance name).
- Example of use:
SqlBackup.exe –S(local)\SQLEXPRESS
- The methodology of working with MSSQL and Firebird databases is different. In the case of an MSSQL server, the database is identified by the database name and the instance of the SQL server, while the Firebird database is identified by a direct physical path to the database. The backed up MSSQL database has the extension “.bak”. The Firebird backup has the extension “.fbk”. The created backup is located in the same directory as the running application “SqlBackup.exe” (without parameters).
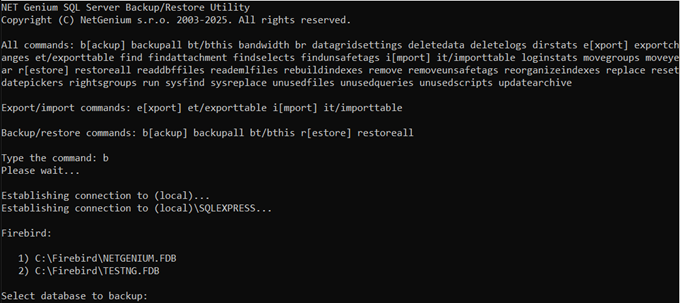
- Elections BTHIS or BT backs up the database that is listed in the “ConnectionString.txt” file in the “Config” folder.

2.4. Operational database recovery
- Copy the relevant operational database from the operational NET Genium to the “Backup” directory of the development. The recovery must be performed via the “SqlBackup.exe” program in the NET Development Genius.
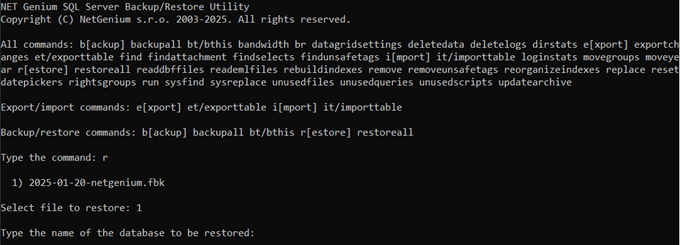
- The database restore is performed by the option R. “SqlBackup.exe” searches for all backups in its location from which it is run and, when found, offers the user which database to restore.

- After selecting the backup from which to restore, you will be prompted to enter the name of the new restored database.
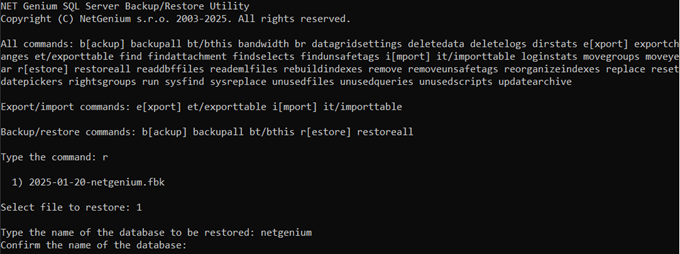
- For security reasons, you will also be prompted to confirm the entered name of the new restored database.
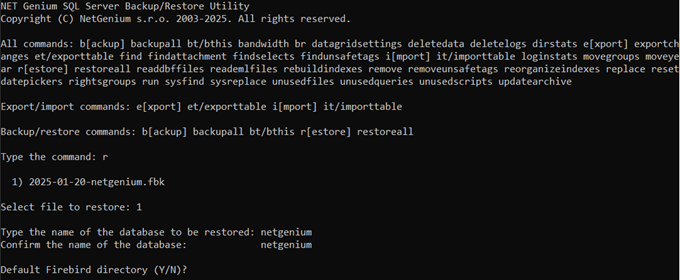
- At the end of the recovery process, you will be asked where the recovered database should be saved in the default MSSQL / Firebird directory.
3. Transfer of development environment to operational
- This transfer can be characterized by two basic steps:
- Export of database structure (merge) in the development environment
- Import of database structure (merge) in the production environment
- The “SqlBackup.exe” program is intended for export and import. It supports the export of MSSQL and Firebird databases, as well as subsequent import. Export and import can also be performed across different databases, for example from an MSSQL database to a Firebird database and vice versa.
3.1. Export (development environment)
- Before exporting the database, it is necessary to unify the version of NET Genium in the development and operational environments - version number and type of version (full vs. tester). The surest way is to update to the latest version of NET Genium, and at the same time wait for NET Genium to start or view page views. Only after running NET Genium, we are sure that the development database has also been updated to the latest version.
- Choice E. The program automatically exports the database, which is listed as the database used in the “ConnectionString.txt” file in the “Config” directory, and saves it to the current location of the program. Next, select option 3.

- Option 3 – Database structure (merge) – exports the database structure (everything except the data in the user database tables). The export is made to a ZIP file named “yyyy-mm-dd-database_name.zip”.
- Then copy the development database structure exported in this way to the “Backup” directory for the “SqlBackup.exe” program in the operating environment.
3.2. Import (operating environment)
- Before importing the database, it is necessary to unify the version of NET Genium in the development and operational environments - version number and type of version (full vs. tester). The surest way is to update to the latest version of NET Genium, and at the same time wait for NET Genium to start or view the login page. Only after starting NET Genium, we are sure that the operational database has also been updated to the latest version.
- Option I. The program “SqlBackup.exe” in the location where it is stored automatically searches for the ZIP file with the exported structure of the development database. Therefore, select this database to import.
- In the next step, options 3 and 4 are especially important.
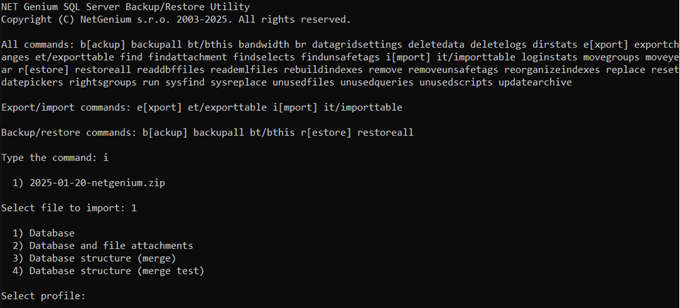
- Option 3 – Database structure (merge) – imports the database structure.
- Option 4 – Database structure (merge test) – starts the import simulation, and generates a report “SqlBackup.htm”, which lists all the differences in the data structures of the user database tables between the development and production environment. If this report contains only the word “OK”, there are no differences between database structures. It also creates a “SqlBackup.sql” file, which contains a list of all SQL statements that convert the existing database structure to the new state. It is important to always choose the merge test before the actual import!
3.2.1. Merge test
- Merge test means a simulation of the import of a new database structure, which is performed to identify possible collisions between database tables and their columns. Collisions in the original and new database structure can occur in different situations. It is important to address them due to possible breaches of operational database integrity and data loss.
- The image below shows an example of the contents of the “SqlBackup.htm” file. This file is generated by the “Sqlbackup.exe” program each time a merge test is performed.
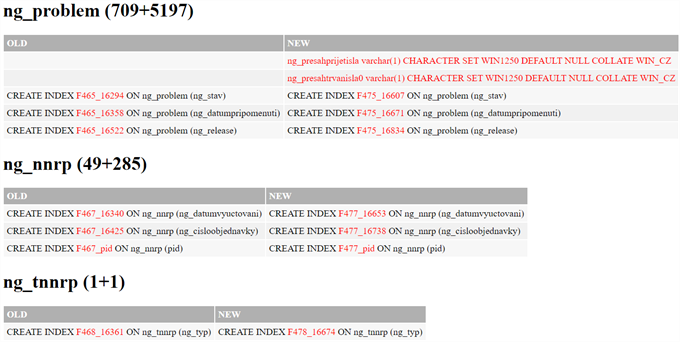
- Column OLD indicates the operational (current) database, NEW indicates the development (imported) database. Items that have been changed are highlighted in red.
- In the “SqlBackup.htm” file, it is important to go through each table with differences and assess whether the highlighted change is OK. There can be three basic situations that have fatal consequences, and neglecting or neglecting them will result in data loss!
- Deleting a column that is in the production environment but is no longer in the development environment, ie in the imported database – NET Genium deletes the column in the production database, and the data stored in this column is lost. The following example shows a situation where there is a “ng_telephone2” column in the operational database, and performing this merge will delete this column.

- Renaming a column – NET Genium first deletes the column with the original name, and then creates a new column with the new name. To avoid data loss by deleting the column with the original name, it is necessary to rename the original column in the operational database to the new name before the operational database is redirected. This situation can also be illustrated in the picture above, where the column “ng_telephone2” could be renamed to “ng_address” in the development environment, for example.
- Changing the data type of a column – NET Genium changes the data type of a column, or in cases where this is not possible from a database point of view, backs up the data in this column, deletes the original column, creates a new column with the correct data type, and then imports the backed-up data into this column – attempts to parse the data from the old data type to the new one. During the data type change process, data may be lost, either by shortening the length of the text string or by changing to an incompatible data type, such as changing a decimal number to a date. The following example illustrates a situation where there is a 50-character column in the production database and it has been changed to 250 characters in the development environment. Performing a merge increases the number of characters that can be stored in the “ng_notificationemail” column. If, on the other hand, the number were to decrease from 250 to 50, it would certainly mean trimming the data in the operational database!

- For the above changes to the database structure, it is important to know the exact reason for the change. Either you know the reason because you made the changes to the development environment yourself, or you have to consult with other developers working on the development environment about this change. No import can take place without knowing the reason for deleting the column, changing the name or changing the data type of the column!
- Changes in the database also include changing the index names, which is caused by deleting the old version of the application in the development environment, and then importing the new version of the application into the development environment. The names of database tables and columns are identical, only the IDs of the edit forms and controls in it have changed. This situation only occurs with the Firebird database server, which uses the edit form ID and the control ID for the index names. These changes are completely harmless.

3.2.2. Merge
- It represents the actual import of the development database structure into the operational database. It is recommended to back up the entire operational database first before performing the import.
- From the perspective of database structure and metadata, merge executes exactly the SQL statements that are listed in the “SqlBackup.sql” file. This file is created when running the “merge test”. In the extreme case, the database structure can be adjusted to the new imported state using this file manually in the “FlameRobin” program for the Firebird database, or in the “SQL Server Management Studio” program for the MSSQL database. Note, however, that it is not possible to convert data from one data type to another in this way if such conversion is part of the merge.
- The database structure import options also offer several options that define what should happen to the user settings. This is especially true for portlets, favorites, and datagrid columns.
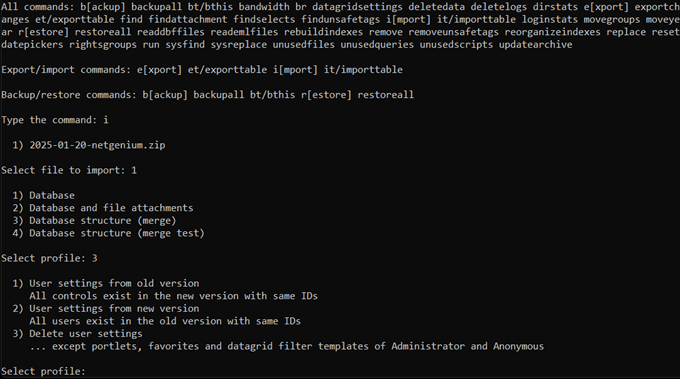
- User settings from old version – defines that all user settings will be preserved from the operating environment.
- User settings from new version – defines that all user settings will be taken from the development environment.
- Delete user settings – all user settings will be overwritten by default values.
- In the last step, the options for printing templates are offered:

- Templates from old version – defines that print templates will be preserved in the production environment.
- Templates from new version – defines that print templates will be taken from the development environment.
- When the import is complete, the “SqlBackup.log” file is created. This log contains a record of the progress of the import.
- After the import is complete, delete the “UnderConstruction.txt” file found in the “Config” directory.
3.2.3. Views
- Merge causes all views in the database to be deleted
- For edit forms that have a database view definition placed in a note, the views will be automatically recreated after the merge, provided that this view was deleted from the database before the merge
- For edit forms that are newly created in the operational database thanks to the merge, the view must be created manually using the “CREATE VIEW” function, which is available in the edit form settings dialog on the “Administration” tab.
4. Transfer of operational data to the development environment
- It is used to fill relevant data into an existing development environment. The transfer of this data can be characterized by the steps:
- Execute a merge from the development environment to the operating environment – to match the structure of both databases.
- Database backup in the operating environment – program “SqlBackup.exe”, option B (backup).
- Recovery of the operational database in the development environment – program “SqlBackup.exe”, option R (restore).
